Showing posts with label link back. Show all posts

Saturday, March 30, 2013

Hard Baked Eggs... huh?

So, in the land of Pinterest we often pin things "for later". Occasionally, when "later" rolls around I actually remember to look them up. One of my "laters" is Easter. Pssst, guess what? Easter is TOMORROW! Holy crap, that snuck up on me! So it's time to decorate eggs with the kids. Here's the thing- I really don't like boiling the eggs. It stresses me out! What if I cook them too long, not long enough, they crack, etc. There's a billion different ways to do it if you google and a lot of people just tell me they wing it every time. Whoa! This girl needs a step by step recipe!

So I had repinned this one thing from "Greetings From The Asylum" about baking your "hard boiled" eggs. That's right, BAKING them. I had pinned it (a couple times, I think), in hopes I'd remember o go back before Easter and look into this method. So tonight before dinner I sat down and read the post explaining what this is all about. Thank you, Alton Brown!

There were many comments on the original post asking if baked eggs could be used for dying at Easter time. No one knew! The original Blogger had only ever made them for recipes. Now was as good a time as any to find out! I baked my one dozen eggs according to the directions.

Alton Brown's Baked Eggs
Prep Time: 2 min.
Total Time: 32 min.
Ingredients:
2 - 4 dozen eggs
DIRECTIONS:
  1. Preheat the oven to 325 degrees.  Position the oven racks in the center of the oven.
  2. Place the eggs parallel to the bars on the racks.  (see picture below)
  3. Place a baking sheet pan in the bottom of the oven (just in case an egg breaks).  I have never had a mess in my oven in all the times I have made this recipe.  I have had eggs break, but they cooked inside when they do so there is no mess
  4. Bake for 30 minutes.
  5. When the eggs are done, fill a large bowl with ice water and move the eggs into the bowl.  I do this a few minutes ahead of time to make sure the water is COLD!
  6. Peel the eggs as soon as they're cool enough to handle, then return them to the ice water to thoroughly chill.  I think that the eggs are easier to peel if they are allowed to chill in the water for at least 10 minutes.  Also, I peel the eggs under cool running water.  
 This recipe works best with the freshest eggs you can find.
Before I let my Pumpkin & Junebug start dying, I figured I'd try one egg to make sure the process worked for me, just in general. Then I would know if it was the baking that messed up the dying or vice versa. Holy crap! That egg I tasted was amazing! Peeling it under cold running water made it so easy and it was PERFECT. I'll never boil another "hard boiled" egg!

The kids went ahead and dyed the eggs and they look perfectly normal! This pin definitely came through for me!

Friday, March 29, 2013

Bunny Bait

First off, man have we gotten behind on our project 52 posts! Don't worry- good things still happening just need to post. =)

Couldn't resist taking a break to share another Pinterest find! Tonight we made "bunny bait"!  It's so cute and SO easy. I'm assuming it'll be super yummy when we finally dive into it, too!

First gather your popcorn (popping your own would be better, but they only had buttery when I ran into Target), pretzel sticks, m&ms and white chocolate:


Find some helpers, but make sure they don't eat all the ingredients, like mine!


Mix it all in the bowl (break the pretzels in half) and then pour the melted chocolate on top and stir to mix well. Spread it on wax paper to cool and break apart to enjoy!


Thanks to Sing For Your Supper for the recipe!!!


Friday, February 22, 2013

Flashback: Pinterest success!

Today I wanted to do a 'flashback' post to this idea I found on Pinterest that came out so cute! Last summer I made this circle map thing I found on a 1st grade teacher's blog (via Pinterest). It came out so well and my Pumpkin loved it. She still plays with it 8 months later! Here's the original post. This is what we made:


Sunday, February 17, 2013

Pancakes!

Tonight we had pancakes for dinner! I made them from scratch with this recipe from allrecipes.com

Original recipe makes 8 pancakes
(I doubled it and got more than 16, but I did make the kids' pancakes smaller)
  •  3/4 cup milk
  •  2 tablespoons white vinegar
  •  1 cup all-purpose flour
  •  2 tablespoons white sugar
  •  1 teaspoon baking powder
  •  1/2 teaspoon baking soda
  •  1/2 teaspoon salt
  •  1 egg
  •  2 tablespoons butter, melted
  •  cooking spray
Directions

1. Combine milk with vinegar in a medium bowl and set aside for 5 minutes to "sour".
2. Combine flour, sugar, baking powder, baking soda, and salt in a large mixing bowl. Whisk egg and butter into "soured" milk. Pour the flour mixture into the wet ingredients and whisk until lumps are gone.
3. Heat a large skillet over medium heat, and coat with cooking spray. Pour 1/4 cupfuls of batter onto the skillet, and cook until bubbles appear on the surface. Flip with a spatula, and cook until browned on the other side.

I added a sprinkle of cinnamon and a dash of vanilla. SO YUMMY! And fluffy!


Thursday, February 14, 2013

Valentine's

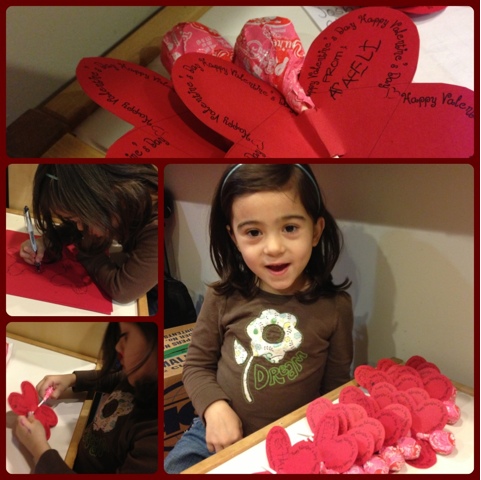
Last night my little Pumpkin got to stay up late to write her Valentines. She worked very hard to write each of her 14 classmates' names (some of which she knew how to spell without help!!) and both of her teachers' names, as well as writing her own name 16 times on the "from" line.

Mama cut out each butterfly, but she filled them with the suckers! Thanks to Skip to my Lou for the free download!

Wednesday, July 18, 2012

1 Week of Pinterest: Days 2, 3

1 new recipe
1 project for your home
1 craft type project
1 project for your toddler
2 of your choice
1 free day/do nothing

Day 1:
1 project for your toddler. (click to view)


Day 2:
(free day)


Day 3:
1 project of your choice
This one was found on a first grade teacher's blog. She used it as review after a map unit and the kids did the creating. Since I made it for my 3 year old, I created it myself. Here's the original:


And here's ours:


I LOVE it, and so does my Pumpkin!

Monday, May 28, 2012

Homeschooling Pre-school

Despite being a teacher and a parent,  I never really saw those roles combining. Of  course, as a mother I teach my child certain skills and things, but I never predicted I'd venture down the path of homeschooling. Here I am, though, it's the first full week of summer break and I've been sitting at my computer for over an hour mapping the curriculum of our summer preschool home schooling adventure!

The reason I decided to really put a lot of effort into this is my 3 year old (Pumpkin's) birthday is in October- past the September cutoff for Kindergarten. So that means she potentially has two full years before she can enter Kindergarten when she is 5, almost 6 years old. Knowing my child, I just know that's not going to be a good fit for her. She's incredibly quick and will need to be challenged much sooner than that. This summer we're going to work on a lot of basic things using the preschool curriculum from www.letteroftheweek.com. Let me tell you, what a FANTASTIC site! Katrina took the time to lay out EVERYTHING... themes, subject areas, reading lists. It's amazing. All I'm doing is plugging it into our calendar for the best fit for us and tomorrow we'll begin. I can't recommend this site enough. Plus, I'm so grateful because, quite frankly after the last few months of teaching my high schoolers ... lesson planning was the last thing my brain could handle right now!

Saturday, May 12, 2012

Parmesan Crusted Chicken

I pin, literally, hundreds of recipes on Pinterest. Obviously, I don't have them time to make them all, but I do feel accomplished when I get the time to try one! Tonight for dinner we had Parmesan Crusted Chicken. My favorite part about this one? EASY!!! Only four ingredients and so quick. I pinned the recipe from The Enchanted Cook and I highly recommend this one for a quick go-to flavorful dish.


Photo credit: The Enchanted Cook

Tuesday, April 3, 2012

Spring Break Productivity Pt. 3

Continuation. Read Pt. 1 here and Pt. 2 here.


Teething Necklace.
My little Junebug has some seriously swollen gums right now. Poor guy is drooling everywhere, putting everything in his mouth and losing sleep. And, well, we all know when baby loses sleep, so does Mama! We've been working on nighttime, but during the day I'm constantly grabbing big sister Pumpkin's toys out of his mouth. Oh, and if you pick him up, be warned you'll be covered in slobber later!


So, when I saw this on Pinterest, I thought, "oh yay! cute AND functional." So, I got right to it! Rebekah already has written out a very simple tutorial on A Bit of Sunshine, so head over check that out. Here's the one she made:


And mine that I'm loving!


Monday, April 2, 2012

Spring Break Productivity Pt. 2

Continuation. Read Pt. 1 here.

TV Tray Ironing Board.
If you know anything about me you know I'm a complete and total pinaholic.

Pinned Image

Over Spring Break I decided it was the perfect chance to actually make some of the things I've been pin, pin, pinning away for months! One of the things I was most excited about was this tv tray turned pressing board [tutorial from Oh, Fransson!] This is of high importance since we moved my entire sewing table and set-up to the office to allow me more access to it. (When it was in the bedroom I was hardly ever able to sew, seeing as hubby was often asleep when I wanted to sew.) Since moving it to the office I didn't have an ironing board nearby.

So, I picked up a TV tray at Target for $9 and picked up some natural batting and an outdoor fabric. Armed with my brand new staple gun (see Pt. 1) I got to work. Literally a few minutes later I was the proud new owner of a personal pressing table:


Cute, right? I love it!

Monday, March 19, 2012

The new age of postcards

Are you planning a family get away soon? Looking to share your trip with family and friends? How COOL is this?! Send postcards directly from your phone! It's an app called postagram and it's available for iPhone and Android. Sarah explains it all here. LOVE this!

Monday, February 20, 2012

Little Sapling Toys

In one of my many online mommy groups Little Sapling Toys's wooden teethers were recommended and I think they are SO stinkin' cute. I'm so excited about them I'm blogging about them before even having tried them out, haha! Our Junebug is being baptised soon and I've asked his godmother (-to-be) to give him one of their wooden teethers because I love them. The have such a huge variety, too. You've got to check them out!

Thursday, February 16, 2012

By Request: Tooth Fairy Pillow

So I've been seeing about 3,139,723,186 different projects on Pinterest that I want to try. But of course every time I go to my board to pick a project I get overwhelmed and quit, haha. Then a good friend asked if I had any plans to start making tooth fairy pillows. Well, indeed it was a project on my infinitely long to do list! So it seemed like as good of a place to start as any other.

So, this afternoon I got the little Junebug down for a nap after a hearty lunch (first time having a quesadilla, his little tummy is full!) I decided to see what I could whip up! After browsing Pinterest some more and sketching out exactly what I wanted, I got to work!

Using fabric scraps made this project both quick but economical as well ;) I'm looking forward to being able to knock these out a few at a time and have them as a regular listing in my shop!

Thursday, February 2, 2012

Baptismal Outfit

Today my mom and I shopped for Junebug's baptismal outfit. After two stores we headed to JoAnns, which is probably where we should have just started in the first place! After just a minute we found the PERFECT pattern from Burda. It was a new brand for me, and it pleased me to see it was from Germany =) Ah, nostalgia...

Anyways here's what I got:

I won't be making the shirt or the bow tie and I'll be altering the pants a bit (no cuff, a bit longer and maybe wider). I got some lovely linen, which I'm thinking is going to look fantastic! I can't WAIT to see how this turns out!

Wednesday, February 1, 2012

Plum Pickin'!

A lot of you are probably familiar with the daily deal websites that are available. I've posted about quite a few, in fact. Many of them are geared towards moms and babies and what not. This one..... all. about. crafting. ohhhh yeaaaaah.


They post one deal a day at 7am (MST). It's early, but man is it worth it! You can sign up to receive their notifications, but you still better be quick because things sell out fast!!

Look what I most recently purchased:


oh.em.gee. I cannot WAIT  to add them to my next sewing project! Yay for branding =)

And I have to say their customer service is pretty freaking awesome too! One item they posted, they had said (on their facebook) "teachers are going to love this!" Well, as a teacher I was pretty excited, but also bummed, because I knew that typically things are sold out by the time I get home from school. They responded right away and said to email them when I got home from work. They saved me one and I was able to snag a personalized stamp that I now use in my classroom every. single. day. YES! Love them!

Saturday, January 7, 2012

2012!

Man, did school and parenting slow me down! Haven't been posting much because I hardly find the time to sit at the computer! The good news is we're cleaning up the house and re-arranging so that the kids have more safe playing space near both my sewing machine and computer so hopefully I'll be updating a lot more! In the meantime here's a fun site I've found:


Saturday, August 20, 2011

Pinterest

This site is like crack! If you thought you were addicted to facebook or blogger or etsy, look out!
"Pinterest lets you organize and share all the beautiful things you find on the web. People use pinboards to plan their weddings, decorate their homes, and organize their favorite recipes. Best of all, you can browse pinboards created by other people. Browsing pinboards is a fun way to discover new things and get inspiration from people who share your interests.
I love love love it! I'm a pinning fiend! You have to request an invite but you can also be invited by members, so feel free to leave your email for me to invite you if you're not already pinning! If you are, leave your name so I can follow you!

Monday, August 15, 2011

the "pillowcase" dress

Surely you've seen pillowcase dresses, they're all the rage among toddler wardrobes these days! The styles range from simple to more elaborate with multiple fabrics and bias tape and what not. So which do I choose for my first attempt? The elaborate one, of course! ;) It took me a few hours to complete, especially with my repeated checking of the tutorial from Little Big Girl Studio (I'm kinda hyper vigilant). But I'm THRILLED with the way it turned out! I only wish it wasn't 11pm when I finished so that I could have Pumpkin try it not right away!!! But that will have to wait until tomorrow after work I guess =(


The best part is I have more of the brown polka dot fabric that I will use to make a necktie onesie for my Junebug =) Yay for matching sibling sets =P


the "simple skirt"

For months now I've been bookmarking tutorials left and right of various projects I want to make. The past few weeks I've now taken to "pinning" things. Finally, tonight, I made some stuff! And I'm so in love =). This simple skirt tutorial was such a breeze. I knocked it out in about an hour- would have been faster had I not been tending to a toddler and newborn and stopping to re-read directions in between!

I've been planning to make this one for a while now so I actually planned in advance and took my daughter (a.k.a. Pumpkin) with to JoAnn's and let her choose the fabric. This make the skirt 100x more exciting, trust me! Here's our finished product:


Pumpkin showing off the fit:


Tried to photograph her wearing it and all I got was a blur from her twirling... she's in love with this skirt!


Tuesday, July 26, 2011

Gs By Me

So with Junebug we (I) decided to take the plunge into cloth diapering. It's kinda scary and overwhelming at first, but I decided a nice way to "dip my toes" into the CDing world would be the hybrid brand gDiapers. They're awesome because you can do cloth inserts and be 100% cloth or you can get the biodegradable inserts, which are flushable, compostable or trashable (where they breakdown, unlock disposable diapers which sit in landfills for years and years and years.....).

I think the best part of CDing is all the fun colors and patterns! Now, gDiapers sells mostly solid colors, but that's almost better because you can spiff them up all you want! This great business I found on Facebook embroiders the gPants with almost anything you can imagine! Awesome! I custom ordered this one to match Junebug's bedding (which I swear is almost done!!!):


So if you're a gDiapering family too you should check out Gs By Me.