Saturday, March 30, 2013

Hard Baked Eggs... huh?

So, in the land of Pinterest we often pin things "for later". Occasionally, when "later" rolls around I actually remember to look them up. One of my "laters" is Easter. Pssst, guess what? Easter is TOMORROW! Holy crap, that snuck up on me! So it's time to decorate eggs with the kids. Here's the thing- I really don't like boiling the eggs. It stresses me out! What if I cook them too long, not long enough, they crack, etc. There's a billion different ways to do it if you google and a lot of people just tell me they wing it every time. Whoa! This girl needs a step by step recipe!

So I had repinned this one thing from "Greetings From The Asylum" about baking your "hard boiled" eggs. That's right, BAKING them. I had pinned it (a couple times, I think), in hopes I'd remember o go back before Easter and look into this method. So tonight before dinner I sat down and read the post explaining what this is all about. Thank you, Alton Brown!

There were many comments on the original post asking if baked eggs could be used for dying at Easter time. No one knew! The original Blogger had only ever made them for recipes. Now was as good a time as any to find out! I baked my one dozen eggs according to the directions.

Alton Brown's Baked Eggs
Prep Time: 2 min.
Total Time: 32 min.
Ingredients:
2 - 4 dozen eggs
DIRECTIONS:
  1. Preheat the oven to 325 degrees.  Position the oven racks in the center of the oven.
  2. Place the eggs parallel to the bars on the racks.  (see picture below)
  3. Place a baking sheet pan in the bottom of the oven (just in case an egg breaks).  I have never had a mess in my oven in all the times I have made this recipe.  I have had eggs break, but they cooked inside when they do so there is no mess
  4. Bake for 30 minutes.
  5. When the eggs are done, fill a large bowl with ice water and move the eggs into the bowl.  I do this a few minutes ahead of time to make sure the water is COLD!
  6. Peel the eggs as soon as they're cool enough to handle, then return them to the ice water to thoroughly chill.  I think that the eggs are easier to peel if they are allowed to chill in the water for at least 10 minutes.  Also, I peel the eggs under cool running water.  
 This recipe works best with the freshest eggs you can find.
Before I let my Pumpkin & Junebug start dying, I figured I'd try one egg to make sure the process worked for me, just in general. Then I would know if it was the baking that messed up the dying or vice versa. Holy crap! That egg I tasted was amazing! Peeling it under cold running water made it so easy and it was PERFECT. I'll never boil another "hard boiled" egg!

The kids went ahead and dyed the eggs and they look perfectly normal! This pin definitely came through for me!

Friday, March 29, 2013

Bunny Bait

First off, man have we gotten behind on our project 52 posts! Don't worry- good things still happening just need to post. =)

Couldn't resist taking a break to share another Pinterest find! Tonight we made "bunny bait"!  It's so cute and SO easy. I'm assuming it'll be super yummy when we finally dive into it, too!

First gather your popcorn (popping your own would be better, but they only had buttery when I ran into Target), pretzel sticks, m&ms and white chocolate:


Find some helpers, but make sure they don't eat all the ingredients, like mine!


Mix it all in the bowl (break the pretzels in half) and then pour the melted chocolate on top and stir to mix well. Spread it on wax paper to cool and break apart to enjoy!


Thanks to Sing For Your Supper for the recipe!!!


Friday, February 22, 2013

Flashback: Pinterest success!

Today I wanted to do a 'flashback' post to this idea I found on Pinterest that came out so cute! Last summer I made this circle map thing I found on a 1st grade teacher's blog (via Pinterest). It came out so well and my Pumpkin loved it. She still plays with it 8 months later! Here's the original post. This is what we made:


Sunday, February 17, 2013

Pancakes!

Tonight we had pancakes for dinner! I made them from scratch with this recipe from allrecipes.com

Original recipe makes 8 pancakes
(I doubled it and got more than 16, but I did make the kids' pancakes smaller)
  •  3/4 cup milk
  •  2 tablespoons white vinegar
  •  1 cup all-purpose flour
  •  2 tablespoons white sugar
  •  1 teaspoon baking powder
  •  1/2 teaspoon baking soda
  •  1/2 teaspoon salt
  •  1 egg
  •  2 tablespoons butter, melted
  •  cooking spray
Directions

1. Combine milk with vinegar in a medium bowl and set aside for 5 minutes to "sour".
2. Combine flour, sugar, baking powder, baking soda, and salt in a large mixing bowl. Whisk egg and butter into "soured" milk. Pour the flour mixture into the wet ingredients and whisk until lumps are gone.
3. Heat a large skillet over medium heat, and coat with cooking spray. Pour 1/4 cupfuls of batter onto the skillet, and cook until bubbles appear on the surface. Flip with a spatula, and cook until browned on the other side.

I added a sprinkle of cinnamon and a dash of vanilla. SO YUMMY! And fluffy!


Thursday, February 14, 2013

Valentine's

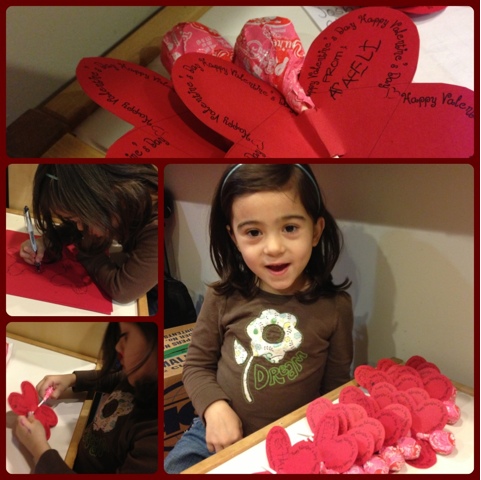
Last night my little Pumpkin got to stay up late to write her Valentines. She worked very hard to write each of her 14 classmates' names (some of which she knew how to spell without help!!) and both of her teachers' names, as well as writing her own name 16 times on the "from" line.

Mama cut out each butterfly, but she filled them with the suckers! Thanks to Skip to my Lou for the free download!

Tuesday, February 12, 2013

Food Pantry Field Trip

Remember the food pantry donation from our Week 4 RAK? Well, today my Junebug and her pre-K class took a field trip (on the BUS! wow were they excited!!) to deliver those donations. They learned about how the donations were going to help the community and they were each given a bag to carry into the facility. The local newspaper was even there- can't wait to see the story! I'm so proud of our little girl and the things she is learning.

Monday, February 11, 2013

Two New Juice Recipes!

We tried two different juice mixes today. I thought they were both SUPER yummy, and I liked them better than the last one we did with cucumber!

This first one was:
  • 4 apples
  • 4 stalks of celery
  • 8 carrots
yield: 30oz

I poured two large glasses, rinsed the pitcher and started again!

This one was:
  • 2 mangoes (we used fresh sliced mango, so this is a rough guess)
  • 1/2 pineapple (again we used fresh sliced pineapple, so this is a guess, could've been more than 1/2)
  • 1 mini cucumber (last time I used two and it was really strong, so I decided to try smaller this time)
yield: 30oz

p52 | Week 6

For this week's random act of kindness we made a small donation to Pumpkin's pre-K classroom. When Pumpkin started doing puzzles a couple years ago she'd blow through them so quickly! Luckily the dollar store carries puzzles, because we were getting new ones all the time. I was picking them up every time I was at the store & saw them for $1.

I have had this bag sitting around for a while now and decided these could be put to good use somewhere! This morning we took them to school with us and presented them to Pumpkin's teacher. When I picked her up, we had a thank you note in her cubby - aw!!


Saturday, February 9, 2013

Veggie Juice

Today after a big trip to Costco to get more produce we were ready to make some more juice! We invested in a lot more veggies this time and I found a recipe on the Omega website. This veggie juice didn't seem to call for all that much, so I didn't think it would make a lot. I doubled the recipe for us:

Veggie Juice
  • 1 cup of spinach
  • 1/2 cucumber
  • 2 stalks of celery
  • 3 carrots
  • 1/2 apple
yield: 20oz (WHEN THE RECIPE IS DOUBLED)
Juice cucumbers with their skins on. The dark green skin is a great source of chlorophyll, a phytochemical that can help build red blood cells. Make sure to wash them before juicing.
While it was still a good juice, it wasn't my favorite. The cucumber smell and taste were very noticable. I think if we make it ahead I would double the apple or maybe even add another fruit. Also, drink it right away because if you let it sit you'll notice the juice brown the way a cut apple would.

Tuesday, February 5, 2013

Juice #3

3rd day of juicing!! Another winner. We keep upping the amount of produce we use and today we sort of made the pitcher overflow. Oops. Maybe we'll scale it back just a wheeee bit next time.

CarPearWi Juice
Carrot, Pear, Kiwi Juice
  • 8 carrots
  • 6 pears
  • 6 kiwis
yield: 40oz

Monday, February 4, 2013

p52 | Week 5

For this week, I was just returning to work after a lot of sick days. I'd had some health troubles and the office ladies at the school I teach at seriously came through helping out getting me subs and helping me out. Junebug helped me bake some cookies for them =)


Update: The ladies said the cookies were VERY good and they appreciated them!

Sunday, February 3, 2013

Juice #2

Since our first attempt at juice went so well, we increased the amount of fruits & veggies we used, in order to get a higher yield of juice. It was another yummy one!

CarStrawEarWi Juice

Carrot, Strawberry, Pear, Kiwi Juice
  • 6 carrots
  • 6 large strawberries
  • 6 kiwis
  • 1 pear 
yield: 25oz


Saturday, February 2, 2013

Adventures in Juicing!!

Due to some recent health issues of mine we've revisited the topic of juicing. It'll be good for weightloss, but also just an easy way to incorporate more fresh fruits & veggies. And avoiding added sugars and carbs. It's not going to be easy, since I love food...and junk food. But I'm really committed to getting better things in my system!

Yesterday we went to Bed Bath & Beyond, and using one of their awesome 20% off coupons we purchased a Breville juicer! We used it for the first time tonight... ah-maz-ing! First, that thing has power! Second, we have NEVER juiced before so we weren't really sure on fruit/veggie combos to make a yummy juice. It was SO simple!

Here's our first step into juicing:

CarAppEar Juice
  • 4 carrots
  • 1 large apple
  • 1 pear
yield: 15oz of juice


It turned out so fantastic, my husband chugged most of it and I whipped up another batch right away! Our Pumpkin & Junebug even enjoyed a few sips =)


Monday, January 28, 2013

p52 | Week 4

For week 4, my Junebug's pre-K class (and whole school) is collecting donations and taking a field trip to the food pantry. We donated a few items we had lying around as extras: paper towels, tooth paste, canned foods.


Sorry it's blurry, she was CLEARLY excited to drop off our items, haha!

Monday, January 21, 2013

p52 | Week 3

I don't know if I should count this, because it's technically not so 'random' but I made dinner for a co-worker's family. He's been in and out of the hospital with pneumonia and pleurisy and it's been a rough few weeks for his family, especially since they have little ones. A few co-workers signed up for days to make meals for the family, so I jumped on the opportunity.

I made what has become my go-to make ahead meal for other families. (I've also given it to families with new babies.) I made cheesy chicken enchiladas, a recipe I found on Pinterest over a year ago. It's pretty easy and SUPER yummy. In fact, I made a double batch, so that my own family could have it for dinner the next night, too!

It's super easy to give as a meal paired with chips & salsa. I also threw in a cake for this family that I had picked up in the bakery when grocery shopping. =)

So, that's all. Nothing major but I think it's great to help out whenever you can!

Monday, January 14, 2013

p52 | Week 2

So for Week 2 we went a little more simple. I left a Baggie with change for a drink taped to the pop machine in the lounge at my work. I also put one of our RAK cards and a post-it that said "thirsty?"


This was kind of a funny one to explain to Junebug. When I said I was going to leave money for someone to get a drink if they didn't have their own money, she responded with "like the people with no houses?" (We just moved to a big city and have recently had to cover the topic of homeless people) So I explained some more and showed her the pictures I took. Still not sure if she 'gets it'... but I do! ;)


Monday, January 7, 2013

p52 | Week 1

Project 52: Week 1

As I posted previously, I was really excited to start this Project 52: 52 Random Acts of Kindness. I've been talking it up a lot with my Pumpkin (Junebug just stares at me and laughs...) and trying to explain to her why were doing this. At first she was confused,  thinking we were giving Christmas presents, but now she's starting to understand more and getting excited, too! She's even come up with a few ideas of her own for the Random Acts, which I think is just awesome.

For Week 1, it was a little last minute, but I'd planned it that way. I wanted the first one to be for the kids' teachers at their school/daycare. We didn't go back from break until the 7th so that's why it was the tail end of week 1.


I created this printable of cards. There are lots of free printables out there already, if you just do a search for 'project 52' or 'random acts of kindness', but I wanted to create an original =) and it's available for you to download, as well.

So, I cut up the cards and mixed up some goodies (Tastefully Simple's Blue Ribbon Blueberry Bars, yum!) and in the morning we delivered them to the kids' teachers. Pumpkin was so excited and spent the whole day asking each teacher she saw if they'd had a special snack from us! Week 1: success!